Taking a screenshot on Mac can be utilized without third-party software. Within one click it should be taken if you are following the ways below. Users get comfortable with default options.
But there are some ways to increase facilities on taking it like rectangular region, adding text, uploading on a cloud, getting a short URL, and, directly sharing on social platforms.
Taking on a different format such as PNG, JPG, or for Web like WebP is possible with external software, even. Mainly, when you are moved to macOS, it will be important to know the method.
Technical Guide To Capturing A Screenshot

No matter whether your Mac is Air or Pro, press “Command+Shift+3” just and see the magical way to take a screenshot on MacBook. It will be snapping your full screen. But do you need rectangular region snapping? Follow this- “Command+Shift+5″ to capture a zone with a flexible cropping tool. “Command+Shift+4” to drag and capture instantly.
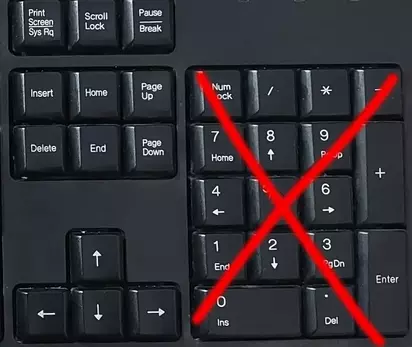
Pro Tip: If you are using an external keyboard that has a Numeric keypad option. Then you have to know that the numbers you will use on taking a screenshot should be from the upper side of your external keyboard.
Is There A Default or Built-in Software To Capture A Screenshot On MacBook?
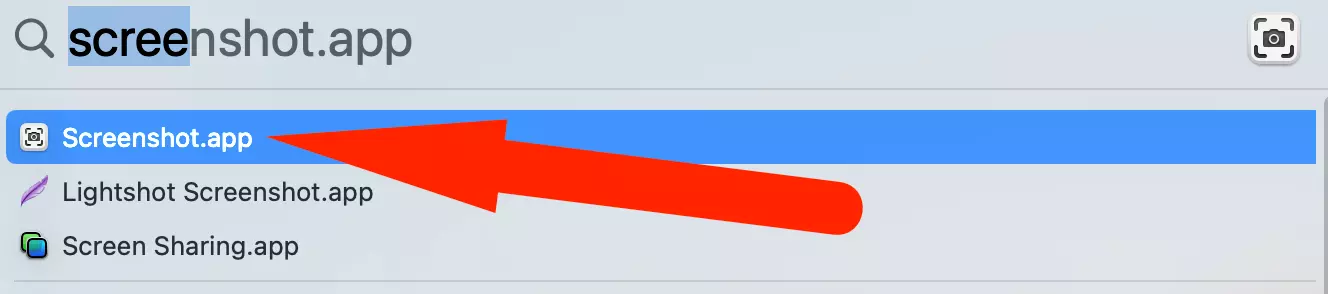
Yes. There is software known as the Screenshot app pre-installed, already. No subscription fee or license number to activate it. Developed by the Apple Inc. To find or open the app
-Go to the Launchpad and type Screenshot to reach it easily.
-Or, after the launchpad opens follow the other folder. There are so many tools available on there also.
-Or, the super shortcuts press Command+Spacebar and type the app name you want to open.
What Are The Method To Capturing With Default Software?
Described briefly in the technical guide section above. There are 3 easiest ways with the default application. But a question raising be on you about what is the best command? It depends on your wants. use them according to your needs.
![]()
#1 For Full Screen and Instantly – Command+Shift+3

Best for beginners to full-screen capture within a second. It will take the entire screen whatever app you have opened or you are in on your desktop screen. So you have to be careful when placing this command and sharing the taken photo anywhere. Because it can scrap and disclose your sensitive information when you accidentally share it on the web.
- Lack of functions
- Full Screen
- Fixed
- No Customization
- Best for Begineer
- Saving on Desktop
#2 Rectangular Easily – Command+Shift+4

If you will placing this command on your MacBook Air or Pro, You can take the SS in a rectangular mode easily. But it should be the worst method for you sometimes. Because after the command your cursor will work for selecting a rectangular area you need. So you have to select the right position for your cursor. After the command, simply take the decision before clicking on the screen.
Mind that: Your first click will be in the top left corner of your captured image.
- Lack of functions
- Customization- No
- Easy? – Yes
- Best For beginners? – Yes
- Automatic Save on Desktop? – Yes
#3 Flexible and Professional – Command+Shift+5

Flexible and highly recommended if a user needs to customize the rectangular area. A lot of options are beneficiary for the professionals like Freelancers, Web Designers, etc. Custom folder option to save on any location of your Mac. But primarily desktop is selected.
- A lot of functions
- For High Customization
- Best for Pro Level Users
- User Can Change the Saving Location of Screenshots
How To Change The Default Storage Folder?
Generally, shots will be saved on your Desktop. But most user wants to keep their desktop clean by changing the storage location folder.
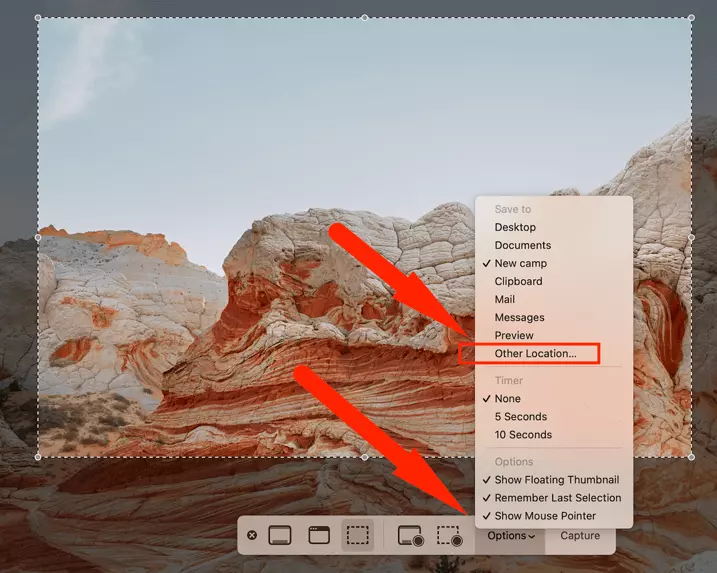
- Firstly, create the folder where you want to store the screenshot you have taken
- Secondly, open the screenshot app
- Click on the Options menu
- Click other location
- Select the folder you have created to save/store your new screenshots
- Done!
Is It Possible To Use Third-Party Free Software for Screenshots on Mac?
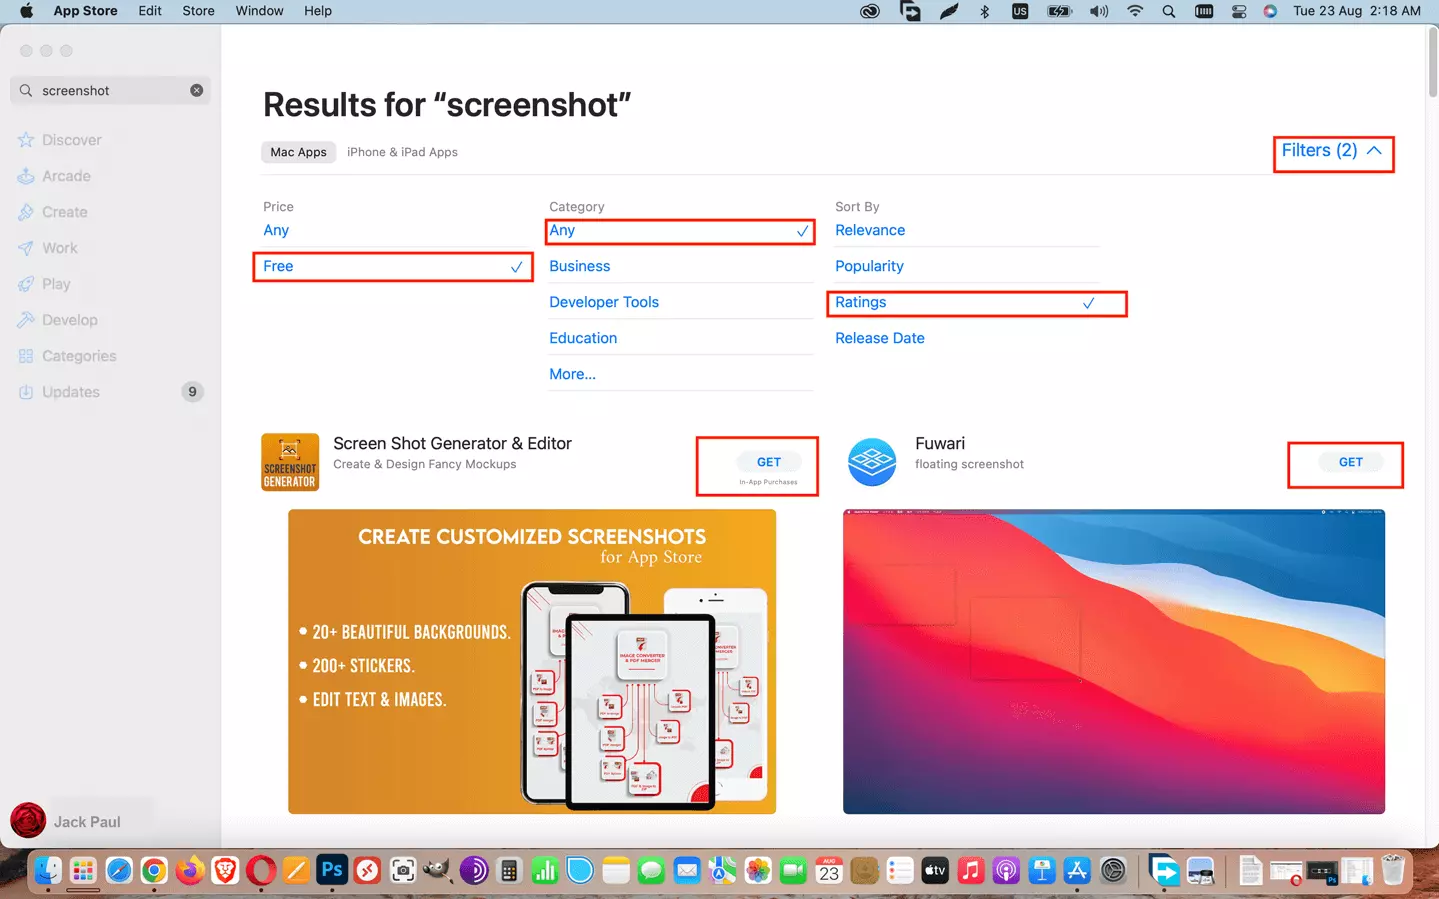
Yes. There are a lot of free and paid edition apps available on the App Store for mac. A lot of apps like Snap Like a Pro, iScreen Shoter, Lightshot, etc. But if you want to get the best out of them, then use the filter option from the app store.
- Open App Store application
- Search “Screenshot“
- Click on Filter
- Price – Free
- Category – Any
- Sort By – Ratings
Just click on the get button to directly install. Do not download it from out of the App store. It can be danger for your data privacy.
Editors Choice For Advanced User – Lightshot
![]()
For a pro person, need pro software always. As an Apple expert, Jack Paul is using Lightshot App. Because it is free, easy to use, and free cloud uploading, sharing short links, and a ton of features.
Lightshot Screenshot App – At A Glance
- For advanced users, But easy to use
- Toolbar navigation – Very Easy
- Text Adding? – Yes
- Text Color? – Yes
- How much color? – Any color
- Color pattern? – Yes, RGB & CMYK
- Adding a Square shape? – Yes
- Adding a Round shape? – Yes
- Arrow Sign? It- Perfect for adding an arrow sign
- Super customization
- Free Account by signing up
- Every Account has access to the free Cloud
- Upload on your Cloud
- File Manager of Cloud
- Manage your uploaded screenshots (Delete, upload)
- No one can access your album
- Secure, safe, easy, and fast!
How To Give Access An App To Take Screenshots?
MacBook Air and MacBook Pro have the world’s best and most secured OS named Macintosh. So in every action, you have to grunt the permission. Capturing your screen can be broken your privacy. As a result, it requires to get permission from the Admin of the Mac Air or Pro.
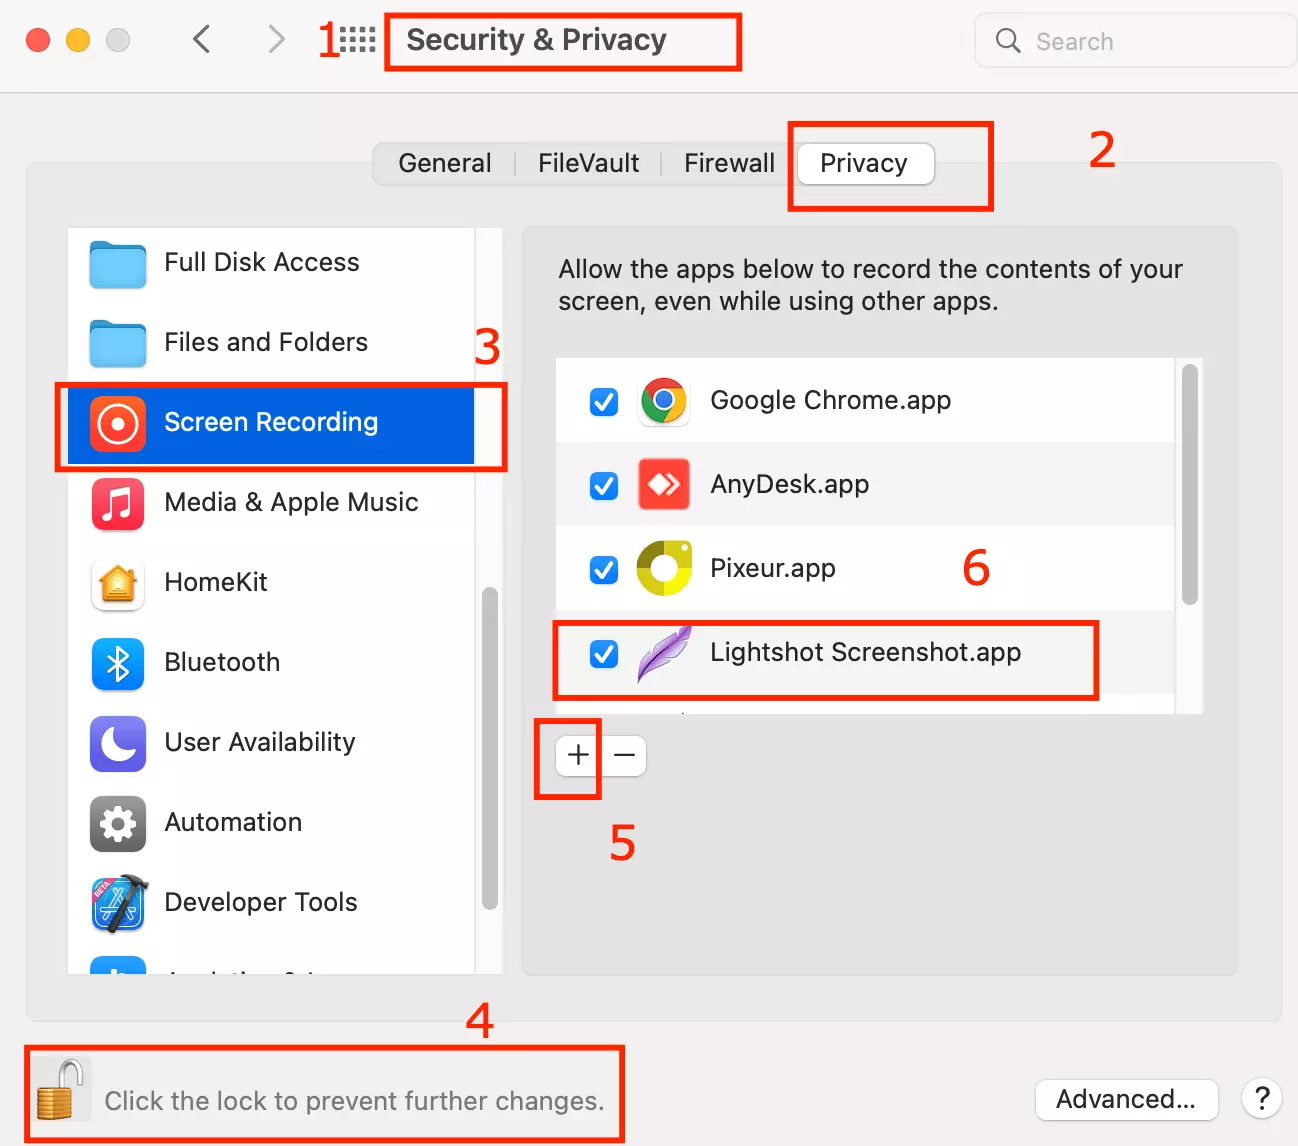
Steps:
- Open System Preferences App
- Go to Security & Privacy Tab
- Scroll on the right side to find out the Screen Recording Option
- Click on the Lock logo to Unlock it (need user password maybe)
- Click on the + (plus) sign button
- Select the Lightshot app
Fine! you have done the accessing the app. Now it can cover any of your opened apps.
Finalizing
The screenshot is an essential thing nowadays for every advanced Mac Air user. The process of capturing a screenshot on Mac Air and Mac Pro is the same. For the beginner, default software can be the best and easiest option. But for an advanced user, has to option of using a third-party application that will help him to take screenshots with some advanced features. Your suggestions and opinion will help us to improve TechNab‘s user experience.